Posts

Tea Light Birthday Cake

Image
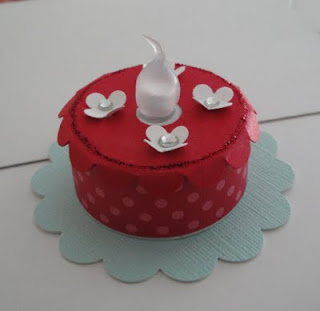
Isn't this little light the cutest? A friend of mine received it as a swap during Convention. I had to come home and make one for myself. If you are signed up for the Birthday stamp-a-stack then you will be taking one of these cuties home. If not, there is still room in the August 6th class so sign up today! It is simple to make, I created this one on my own and then discovered a tutorial on splitcoaststampers after. My design is a bit different I did want a clean circle around the flame. The side is a strip of designer series paper. The top is two parts, the first being the 1-3/4" scallop circle with a 3/4" circle punched out of the center. Attach this piece to the top. Then I took a 2" x 2" piece of card stock and punched a circle using the Itty Bitty Punch Pack (118309). That is where the "flame" will fit. I then took the 1-3/8" circle punch and punched around the tiny circle, your piece will look like a washer. I slid this circle over the

Stamp - A- Stack

Image
Today is the last day to RSVP for the July 30th Birthday themed stamp-a-stack. We will be making 6 cards and a few gift tags. The cost for supplies is $20 and everything will be provided. Bring a friend! Call or email me today to reserve your spot.

Workshop in a Bag!

Image
Here is the fun Workshop in a Bag we received at convention last week. I decided to put some of the samples together because they were so cute! Here is what you will make at your workshop. All of the samples feature the NEW Easy Events stamp set from the 2011 IB&C. Birthday Card Gift Tags Sending Love card Book your Workshop today! Birthday STAMP A STACK $20 July 30th , 2pm or August 6th 10:30am RSVP today

Stampin' Up! Home Office

Image
So, while convention was spectacular, I think the highlight of my trip was a visit to the Stampin' Up! home office. It was a quick 30 minute bus ride ride from the convention center. It's the place where they come up with the gorgeous samples and products, but most importantly where they pack up our orders and ship them out! The warehouse was beautiful, full of paper, ink and rubber. I loved it. Here are some fun shots I took. The Home Office in Riverton, UT My friend Diana and I at the SU! rock The warehouse The picking line!!! Those boxes are full of product! The Atrium The SU! Statement of the Heart I so want this in my house! The desks in Customer Service were covered in adorable samples and ideas. Check out the nugget  flower on the right. So cute! Thanks for looking! Stamp-A-Stack, Birthday theme Saturday July 30th, 2pm $20 Please RSVP by July 25th

Array of Sunshine

Image
Here is the second swap card I created for Convention 2011, I made about 30 of these using the hostess set, Array of Sunshine. You can't quite see it in the photo, but I stamped the flower again on a scrap piece of whisper white, cut the center petals out and popped it up in the middle. Supplies Stamp set: Array of Sunshine and Fabulous Phrases Ink: Crumb Cake, Cherry Cobbler and Early Espresso Paper: crumb cake, cherry cobbler, pool party and whisper white Accessories: vintage wallpaper embossing folder, basic rhinestones, dimentionals, scallop square punch, and scallop dots ribbon in cherry cobbler It is an elegant set and just $8 hostess dollars in clear, $11 in wood. Such a great deal. Here are all of the images in the set.  I think this is my favorite hostess set, you will be seeing a lot of it.  STAMP-A-STACK; Birthday theme Saturday July 30th 2pm $20 RSVP by July 25th

Stampin' Up! Convention 2011

Image
I am just back from 4 fun and busy days in Utah. The trip was amazing, I learned so much! We were treated like Stampin' Up! royalty. Did I mention we got many FREE gifts! We got to see the upcoming Holiday Mini Catalog first and some new SU! products were unveiled. All in all it was an event to remember. Over the next few week I will be sharing with you some of the highlights. It is customary, though optional, to bring card fronts to swap with fellow demonstrators. I made about 75 total. Here is my first one, it is using the Posy Punch hostess stamp set. SUPPLIES Stamp Sets: Posy Punch and Friendly Phrases Ink: Early Espresso and Pool Party Paper: Chocolate Chip, Sahara Sand, Pool Party, Whisper White and Calypso Coral card stock; sahara sand patterns dsp Accessories: Polka Dots embossing folder; decorative label, extra-large oval, fancy flower, 2-3/8" scallop circle, dotted scallop border, 3/4" circle and itty bitty punches; basic rhinestones; dimentionals I look

How to make SU! Paper Peonies

Image
 Don't you just love the paper peonies on the front of the new 2011-2012 Idea Book and Catalog? I do, they are so beautiful and fresh! Here is a quick tutorial on making them. I attached mine to bamboo skewers in the photo, but you can use floral wire as well. If I had some I would have used that. Step 1:  Punch 3 scallop circles using the 2-3/8" scallop circle punch. Step 2: Spray the circles very lightly with water to soften them. Scrunch them up into balls and work them until they are mostly dry. If they are too wet they can tear in the next step, trust me I know ;) Step 3 Unfold them carefully and find an edge where you can easily pull them apart. You will end up with six scallop circles all together. Step 4 Lay all of your circles one on top of the other and secure them with a brad. I chose to layer them fuzzy side up.   Step 5 Pull the layers one at a time up into the center. Step 6 Fluff your flower into the peony shape.