Posts

Showing posts with the label stampinup

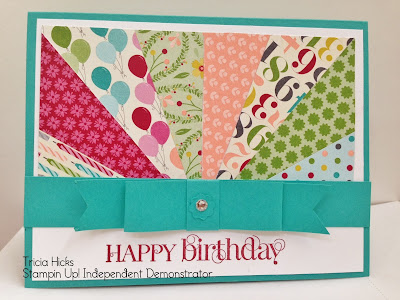
Birthday Starburst card
Image
I just love making this easy card! The starburst really adds an element of fun. we made this card at my last stamp club meeting. This card also features a faux bow using strips of cardstock. I cut 3, 3/4" wide strips of card stock. The longest was the length of my card 5-1/2" x 3/4". The next two were approximately 4-1/2" long. middle piece was flagged at the ends. The next piece I just folded over the ends to meet in the middle. To get a good curve you can wrap the bends around a pencil. I attached that to the flagged piece and wrapped a 1/4" ish x 2" strip around to make the center of the bow. I did have to trim some to make it work. I attached it using a dimentional. I will add a tutorial on the starburst a little later so check back for updates. Supplies: stamp set: curly cute paper: Birthday Basics designer series paper; bermuda bay and whisper white cardstock ink: raspberry ripple accessories: itty bitty punch pack, basic rhinestones and di

Gift Card Flower Bouquet

Image
It is the end of the school year for us.....finally! I can't wait to have my kids home for the summer. I love lounging in PJ's all day, and taking fun day trips to the beach or museums. I'm sure those days will include sibling arguments and a messy house but I choose not to think about that. I have tons of kids activities pinned on Pinterest for those moments I will want to pull my hair out. And when I need a break I will lock myself in my bedroom and skim the internet for new card ideas. That's my plan anyways, we shall see what happens.... Anyways, with the end of the school year comes class parties, school events and teacher gifts. I was room mom for one of my boys classrooms and my co-room mom and I decided on a gift card bouquet for her. It was really fun to put together. I used all of my favorite punches and some techniques I learned from Carrie Cudney herself at the SU convention last year. You can see a quick tutorial on one of the flowers I made  here .

Hey There!

Image
Here is a card I made recently as a swap card. It features the Epic day designer series paper, I do really like that paper :). The stamp set is from the NEW My Paper Pumpkin monthly kit. I get these once a month in an adorable little box. Each month you get a different kit and mini stamp set. The first month comes with this cute stamp set (the Hey There and the splotches), supplies to make 4 cards (not shown) and a clear mount block. You can sign up to receive them regularly, stop at any time or pick and choose which sets you would like to receive. It is a lot of fun and the cards have really come in handy. They only take a couple minutes to complete, perfect for beginners and those with little time to stamp. If you are interested in learning more about the monthly kit just click on this link, MY Paper Pumpkin , to get started. SUPPLIES stamp set: Hey There Friend ink: chocolate chip paper: crumb cake, calypso coral and whisper white card stock; epic day designer series paper

Epic Day Cards

Image
I Love this new line, I am having so much fun with it. I made this card a while back for my local demo group. All of these products are available now! I just layered the circles added the punched flowers and rhinestones. Supplies: stamp set: Oh Hello ink: chocolate chip paper: pool party and whisper white card stock; natural composition specialty paper and epic day dsp accessories: itty bitty punches, 1-1/4" circle punch, modern label punch, basic rhinestones and white taffeta ribbon Hope this inspires your day! Happy Stampin' Tricia

Freshly Made Sketch & New Products

Image
     I needed to get my creative juices flowing so I went in search of a new sketch. I stumbled across this blog Freshly Made Sketches , their sketches are right up my alley, I love their clean and simple style. Usually, I just jot down the sketch and go along my merry way. But this time I decided to actually play along.      I also happened to get my box of NEW Stampin' Up! goodies this week so I have incorporated those as well. Being a SU! demo I get to order a few items from the upcoming idea book and catalog. So I ordered a set of the new In Colors and a couple of the new colors being introduced.      Well, here is the Freshly Made Sketch #84, FMS84, and my first ever challenge version of it. I used three new colors Strawberry Slush, Baked Brown Sugar and the re-introduced Soft Sky. The fluffy flower is made from the Creped Filter Paper, just $2.95 a package. I punched them and colored them with my ink pad. Supplies : stamp set: Label Love (2013-2014 catalog) ink: pri

Sunshine and Sprinkles

Image
My new favorite designer series paper is Sunshine and Sprinkles! I just love the fun springy colors. Now it wasn't one of the first things I ordered because the whales weren't necessarily my thing but the fun patterns on the other side of this paper are what I love. The flower was made with the 7/8" and 1-1/4" scallop circle punches. Supplies: Stamp Set: Wacky Wishes (hostess) Ink: Melon Mambo Paper: Sprinkles and Sunshine dsp; crumb cake, whisper white, and marina mist card stock Accessories: 7/8" scallop punch, 1-3/4" scallop punch, marina mist striped organdy ribbon, and the scallop edge punch Sunshine and Sprinkles dsp 126922 $10.95 This and That A NEW product line! Featuring new designer series paper, card stock stickers, a rotary stamp, washi tape and a cute spiral bound notebook. For details on this new product line watch the video below! And when you purchase the products as a bundle you get a 15% discount! Look for an u

Chalkboard technique card and Introducing Paper Pumpkin

Image
I love this old, but new again new technique. It is so much fun! I think it is the white embossing on the black that gives it so much pizzazz. We made this card at my last stamp club meeting. it features the chalkboard technique and new More Amore dsp. The scallops on the right are actually a doily heart (included in the designer series paper) turned on it's side. The More Amore paper is seasonally valentines but I really try and extend it's use to more than that. I think you can send this cute Hello card anytime. The red scalloped edge on the left is the new Real Red coredinations card stock, it is real red textured card stock with a pink core. So when we distressed the edge a bit you can see the pink inside. Cute! The technique is super easy, just emboss your images in white embossing powder and then daub some white ink around them. You can use white ink and clear embossing powder but the look is less dramatic. Supplies Stamp Set: Lacy and Lovely Ink: versamark (waterm

Perfectly Preserved

Image
I can't say I love this set enough! It is so versatile and so fun. It has everything I look for in a set, images, verses and they have a matching punch, or in this case framelits die set. I love it! What I also love is that you can get the stamp set and dies in a set at 15% off! Don't we love a good deal! We made this card at my last stamp. This card was so much fun to make. I borrowed the layout from Amy O'Neill , I love how she used the paper designs. The fun gingham flower was something I learned at convention from Carrie Cudney, you can see my project and directions on how to make the flower  here . I never got around to adding my verse but we did in class using the modern label punch. Supplies  Stamp set: Perfectly Preserved Ink: early espresso, raspberry ripple, lucky limeade and island indigo Paper: island indigo, cajun craze and whisper white card stock; orchard harvest designer series paper Accessories: 1-1/4" scallop circle, Cannery Set framelits dies

Stampin' Up! Summer Smooches Sneak Peek

Image
Starting today you can order brand new products from the upcoming 2012-2013 Stampin' Up! Catalog. The products include an adorable stamp set, matching dsp, ribbon, brads, fabric and more! I was able to purchase these items about a month ago and must say I love them. They are sweet cute and fun to use and of course in true SU! fashion they all coordinate. We had a chance to try out the new products in my March Stamp Club. These cards feature the grid technique, herringbone and folding paper ribbon. Supplies Stamp set:  Bright Blossoms Ink: Island Indigo, real red, lucky limeade, and crumb cake Paper: real red, whisper white, chocolate chip, sahara sand and lucky limeade cardstock; summer smooches and tangerine tango patterns dsp Accessories: Simply Scored diagonal plate, boho blossoms punch, 1-1/4" square punch, decorative label punch, bright designer button, stampin sponges and island indigo bakers twine Technique: Grid background and ruffled paper ribbon Her

Stampin' Up! Diagonal Score Plate

Image
Now available! Yay! I am so looking forward to getting this in the mail. I can't wait to make custom envelopes and projects. This will open up a whole new door on creativity. You can order yours now for just $11.95 (125586). The plate measures a little over 12 x 12 so you are able to score your 12x 12 sheets of paper. Love that! It fits neatly atop your SU! Simply Scored tool and has two silicone pads to keep it in place. I am having a class on March 23rd and 24th featuring this tool. If you would like to learn more about how to use it please be sure to sign up. The class will be FREE to anyone who orders a Simply Scored board this month! See my classes page for details. Happy Stampin' Tricia

Stationery Box Cards

Image
Here are two cards we are making at club this week. They feature Domestic Goddess designer series paper. Supplies stamp set: mixed bunch, fabulous phrases ink: calypso coral and early espresso paper: calypso coral, sahara sand, and whisper white card stock; domestic goddess dsp Accessories: pool party seam binding, blossom punch and 3/4" circle punch Supplies stamp set: fresh vintage and fabulous phrases ink: calypso coral and early espresso paper: sahara sand, calypso coral and whisper white card stock; domestic goddess dsp Accessories: white bakers twine, 1-1/4" square punch, pool party seam binding and dimentionals Happy Stampin' Tricia

SU! Occasions Mini: Stationery Box front

Image
Here is a sneak peek at something we are making in club on Saturday. It is actually a stationery box but here it looks like a card front, and a cute one at that. Details on my club projects on Saturday... SUPPLIES stamp set: friendly phrases ink: chocolate chip paper: early espresso, calypso coral and whisper white cardstock Accessories: blossom builders, labels framelits die, die cut flowers (NEW, occasions mini) Happy Stampin' Tricia

Soft Suede, Poppy Parade and Pool Party

Image
Such a lovely combo that I never would have paired if it weren't for the Sale-A-Bration designer series paper. This paper is so pretty! I can't put it down and I want to use it on every project I make. I have a card sample for you today that is a variation on one I already did. I have stopped putting greeting onto my card samples as I never have the right one when I need it. I just put my verse on when I am ready to send my card. Supplies: Stamp set: Fresh Vintage Paper: soft suede, pool party and whisper white cardstock; everyday enchantment dsp (SAB only) Ink: soft suede Accessories: decorative label punch, 3/4" circle punch, blossom punch, clear buttons, white bakers twine, and dots embossing folder. This box was adapted from Mary Fish , who got it from another demo, who got it from another demo :). I tweaked it a bit on the lid measurements but everything else is the same. The candies were wrapped using the dsp. My tag was made with the Labels framelits die. My

Designer Cuts Box

Image
I am in love with the NEW Designer Cuts cards in the Occasions Mini, if you have been to any of my classes in the last month you will have gotten to use them. They are so elegant and quick. Well, this sweet box here was made with a single Designer Cuts card.  I personally love it when the products I buy are good for many other uses. So to get on with it here is what you do. Open up your Designer cuts card and lay it down on your Simply Scored board with the line running the same way as the scores. I made a score line 1/2" from the center line on either side. So you will have a total of 3 lines.  Next turn your card 90 degrees and score it at 1" on both sides. You will then cut slits for your tabs from the outside in at the box bottom up to the lines that you just scored. Your box should look like the picture here. The box then folds up. I added a piece of designer series paper on the inside laser cut side before I assembled my box. You can assemble your box with sticky stri

Spotlight on Framelits

Image
I was hesitant about the *NEW* Framelits dies but they are my new favorite accessory, I can do so much with them and they make all of my cards look so "wow", with little effort I might add. The following two cards were done at my last Stamp Club meeting, if you don't belong to a Stamp club you are missing out ;). This card features products from the Sale-A-Bration catalog. We simply attached our dsp to the front and the cut out a "window" using the Labels framelits die, I love that you can place these anywhere on your card. We then cut another frame out of poppy parade to place inside. The lovely butterfly on the front is made using the blossom punch. To get a butterfly fold your blossom in half and trim it to leave only the wings of a butterfly. Supplies Stamps: Fresh Vintage (SAB) and Friendly Phrases (IB&C) Ink: Poppy Parade and Whisper White Paper: Pool Party, Lucky Limeade, Poppy Parade and Whisper white card stock; Everyday Enchantment dsp Acce

Easel Calendar Card

Image
Here are two fun things I put together at Christmas this year. The card is an Easel card with the calendar applied to the front. These items feature products from the NEW Occasions Mini catalog. The easel part is held up with a brad and the flower is popped up. I also ran my flowers through my perfect polka dots embossing folder for added flair. For the book mark I stuck two flowers together using dimentionals and then strung the ball chain through. I then tied the pear pizzazz in between the two flowers so it gave the effect of leaves. Supplies: Stamp Set: Delight in Life (retired) and Fresh Vintage (SAB 2012) Paper: going gray, riding hood red, pear pizzazz and whisper white card stock; Twitterpated dsp Ink: riding hood red and going gray Accessories: perfect polka dote embossing folders, pear pizzazz seam binding, blossom punch, label punch, 3/4" circle punch and an In Color brad. I got the calendars and the ball chain online. Happy Stampin' Tricia