Posts

Showing posts with the label 3D item

Gift Card Flower Bouquet

Image
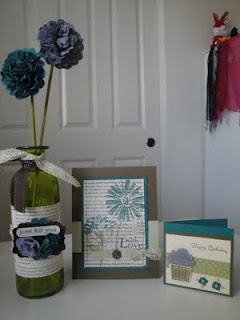
It is the end of the school year for us.....finally! I can't wait to have my kids home for the summer. I love lounging in PJ's all day, and taking fun day trips to the beach or museums. I'm sure those days will include sibling arguments and a messy house but I choose not to think about that. I have tons of kids activities pinned on Pinterest for those moments I will want to pull my hair out. And when I need a break I will lock myself in my bedroom and skim the internet for new card ideas. That's my plan anyways, we shall see what happens.... Anyways, with the end of the school year comes class parties, school events and teacher gifts. I was room mom for one of my boys classrooms and my co-room mom and I decided on a gift card bouquet for her. It was really fun to put together. I used all of my favorite punches and some techniques I learned from Carrie Cudney herself at the SU convention last year. You can see a quick tutorial on one of the flowers I made  here .

Wonderfall and Autumn Accents Frame

Image
This frame was created at my last event, it features the Wonderfall stamp set and Autumn Accents Bigz Die. I purchased the 8 x 8 frame at my local M craft store ;) (SU! policy prohibits me from naming stores in my blog) . I included 5 cards with this class as well, if you are interested in taking this class please sign up by Sunday, November 11th for the Tuesday, November 13th class at 10am.   Supplies Stamp set: Day of Gratitude and Wonderfall Ink: more mustard, rich razzleberry, soft suede and lucky limeade Paper: more mustard, early espresso, lucky limeade, soft suede and rich razzleberry cardstock; polka dot parade (rich razzleberry) designer series paper Accessories: Autumn Accents bigz die, lattice embossing folder, naturals buttons, bakers twine, vintage faceted buttons and the blossom punch Orchard Leaves card Stamp Set: Made for you Ink: Soft Suede Paper: More mustard, lucky limeade, soft suede and whisper white cardstock; Orchard Harvest designer se

Magnet Board

Image
I made this adorable magnet board for my next stamp camp. I have had these cute boards for about a year and it was about time I used them. The background is Stampin' Up!'s designer prints paper. I love these because they come in every single SU color! I always have just the right shade and they always match my card stock. And let's face it, that's what we LOVE about Stampin' Up!. There is still room in my Saturday class if you are interested. It's at 10am, at my home please RSVP as soon as you can. The cost for supplies is $15. I will be repeating the class in August but have not yet determined the dates, please let me know if you are interested. We will also be making this matching dry-erase board. SO cute! Supplies: stamp set: Elements of Style, Elenor Everyday and Sweet Shoppe letters (retired) ink: raspberry ripple, daffodil delight and basic black paper: designer prints paper in  raspberry ripple, daffodil delight and baja breeze, newsprint

Stampin' Up! Summer Smooches Sneak Peek

Image
Starting today you can order brand new products from the upcoming 2012-2013 Stampin' Up! Catalog. The products include an adorable stamp set, matching dsp, ribbon, brads, fabric and more! I was able to purchase these items about a month ago and must say I love them. They are sweet cute and fun to use and of course in true SU! fashion they all coordinate. We had a chance to try out the new products in my March Stamp Club. These cards feature the grid technique, herringbone and folding paper ribbon. Supplies Stamp set:  Bright Blossoms Ink: Island Indigo, real red, lucky limeade, and crumb cake Paper: real red, whisper white, chocolate chip, sahara sand and lucky limeade cardstock; summer smooches and tangerine tango patterns dsp Accessories: Simply Scored diagonal plate, boho blossoms punch, 1-1/4" square punch, decorative label punch, bright designer button, stampin sponges and island indigo bakers twine Technique: Grid background and ruffled paper ribbon Her

SU! Occasions Mini: Stationery Box front

Image
Here is a sneak peek at something we are making in club on Saturday. It is actually a stationery box but here it looks like a card front, and a cute one at that. Details on my club projects on Saturday... SUPPLIES stamp set: friendly phrases ink: chocolate chip paper: early espresso, calypso coral and whisper white cardstock Accessories: blossom builders, labels framelits die, die cut flowers (NEW, occasions mini) Happy Stampin' Tricia

Soft Suede, Poppy Parade and Pool Party

Image
Such a lovely combo that I never would have paired if it weren't for the Sale-A-Bration designer series paper. This paper is so pretty! I can't put it down and I want to use it on every project I make. I have a card sample for you today that is a variation on one I already did. I have stopped putting greeting onto my card samples as I never have the right one when I need it. I just put my verse on when I am ready to send my card. Supplies: Stamp set: Fresh Vintage Paper: soft suede, pool party and whisper white cardstock; everyday enchantment dsp (SAB only) Ink: soft suede Accessories: decorative label punch, 3/4" circle punch, blossom punch, clear buttons, white bakers twine, and dots embossing folder. This box was adapted from Mary Fish , who got it from another demo, who got it from another demo :). I tweaked it a bit on the lid measurements but everything else is the same. The candies were wrapped using the dsp. My tag was made with the Labels framelits die. My

Designer Cuts Box

Image
I am in love with the NEW Designer Cuts cards in the Occasions Mini, if you have been to any of my classes in the last month you will have gotten to use them. They are so elegant and quick. Well, this sweet box here was made with a single Designer Cuts card.  I personally love it when the products I buy are good for many other uses. So to get on with it here is what you do. Open up your Designer cuts card and lay it down on your Simply Scored board with the line running the same way as the scores. I made a score line 1/2" from the center line on either side. So you will have a total of 3 lines.  Next turn your card 90 degrees and score it at 1" on both sides. You will then cut slits for your tabs from the outside in at the box bottom up to the lines that you just scored. Your box should look like the picture here. The box then folds up. I added a piece of designer series paper on the inside laser cut side before I assembled my box. You can assemble your box with sticky stri

How to make SU! Paper Peonies

Image
 Don't you just love the paper peonies on the front of the new 2011-2012 Idea Book and Catalog? I do, they are so beautiful and fresh! Here is a quick tutorial on making them. I attached mine to bamboo skewers in the photo, but you can use floral wire as well. If I had some I would have used that. Step 1:  Punch 3 scallop circles using the 2-3/8" scallop circle punch. Step 2: Spray the circles very lightly with water to soften them. Scrunch them up into balls and work them until they are mostly dry. If they are too wet they can tear in the next step, trust me I know ;) Step 3 Unfold them carefully and find an edge where you can easily pull them apart. You will end up with six scallop circles all together. Step 4 Lay all of your circles one on top of the other and secure them with a brad. I chose to layer them fuzzy side up.   Step 5 Pull the layers one at a time up into the center. Step 6 Fluff your flower into the peony shape.

Cover Creations

Image
I love the projects featured on the front of the 2011-2012 Idea Book and Catalog, so I just had to re-create them. Here is my rendition of those projects using two of the new 2011-2013 In Colors, Wisteria Wonder and Island Indigo. I will post a tutorial on the flowers soon. SUPPLIES Stamp sets: Create a Cupcake Love & Care (Hostess, Summer Mini) Paper: Soft Suede,Island Indigo,Wisteria Wonder,Very Vanilla; First Edition specialty and celery patterns dsp Ink: Island Indigo, Lucky Limeade, Early Espresso Accessories: large scallop punch, decorative label punch, cupcake punch, word window punch, Itty bitty shapes punch, Blossom Bouquet tripple layer punch, chocolate chip scallop dots ribbon, Victoria crochet trim, vintage brad, basic pearls and stampin' write markers OPEN HOUSE SATURDAY JULY 9th 2 -4:30 pm Please RSVP by July 7th

3 x 3 Note Card box

Image
Here is a look at the new color Pool Party In Color for 2011-2013. I made this cute little box to hold some 3x3 notecards. The stamped flower you see on the front of the box is a new Hostess stamp set available this year. Below you will find the complete tutorial on this cute little number. *NEW HOSTESS PROGRAM* This year the hostess program has changed, in the past hostesses were able to pick a level stamp set and had additional hostess dollars to spend. This year hostesses are only given Hostess Dollars which they can use to purchase Hostess only sets at a deep discount or to use on catalog merchandise of their choice. In addition when a hostess reaches just $400 in orders she can choose an item in the catalog at 50% off! I am really excited about this new Hostess Program it is much more versatile. BOX TUTORIAL Here is the tutorial on the card box above, it is so simple and a cute gift. The box is my own design and just a basic box template. You need a piece of cards