Posts

Showing posts with the label technique

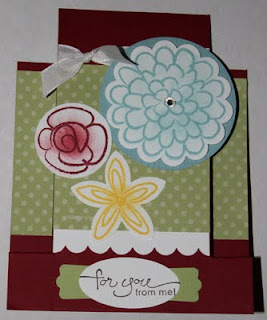
Birthday Starburst card

Image
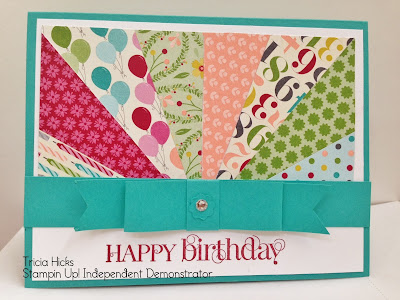
I just love making this easy card! The starburst really adds an element of fun. we made this card at my last stamp club meeting. This card also features a faux bow using strips of cardstock. I cut 3, 3/4" wide strips of card stock. The longest was the length of my card 5-1/2" x 3/4". The next two were approximately 4-1/2" long. middle piece was flagged at the ends. The next piece I just folded over the ends to meet in the middle. To get a good curve you can wrap the bends around a pencil. I attached that to the flagged piece and wrapped a 1/4" ish x 2" strip around to make the center of the bow. I did have to trim some to make it work. I attached it using a dimentional. I will add a tutorial on the starburst a little later so check back for updates. Supplies: stamp set: curly cute paper: Birthday Basics designer series paper; bermuda bay and whisper white cardstock ink: raspberry ripple accessories: itty bitty punch pack, basic rhinestones and di

Chalkboard technique card and Introducing Paper Pumpkin

Image
I love this old, but new again new technique. It is so much fun! I think it is the white embossing on the black that gives it so much pizzazz. We made this card at my last stamp club meeting. it features the chalkboard technique and new More Amore dsp. The scallops on the right are actually a doily heart (included in the designer series paper) turned on it's side. The More Amore paper is seasonally valentines but I really try and extend it's use to more than that. I think you can send this cute Hello card anytime. The red scalloped edge on the left is the new Real Red coredinations card stock, it is real red textured card stock with a pink core. So when we distressed the edge a bit you can see the pink inside. Cute! The technique is super easy, just emboss your images in white embossing powder and then daub some white ink around them. You can use white ink and clear embossing powder but the look is less dramatic. Supplies Stamp Set: Lacy and Lovely Ink: versamark (waterm

Stampin' Up! Summer Smooches Sneak Peek

Image
Starting today you can order brand new products from the upcoming 2012-2013 Stampin' Up! Catalog. The products include an adorable stamp set, matching dsp, ribbon, brads, fabric and more! I was able to purchase these items about a month ago and must say I love them. They are sweet cute and fun to use and of course in true SU! fashion they all coordinate. We had a chance to try out the new products in my March Stamp Club. These cards feature the grid technique, herringbone and folding paper ribbon. Supplies Stamp set:  Bright Blossoms Ink: Island Indigo, real red, lucky limeade, and crumb cake Paper: real red, whisper white, chocolate chip, sahara sand and lucky limeade cardstock; summer smooches and tangerine tango patterns dsp Accessories: Simply Scored diagonal plate, boho blossoms punch, 1-1/4" square punch, decorative label punch, bright designer button, stampin sponges and island indigo bakers twine Technique: Grid background and ruffled paper ribbon Her

Spotlight on Framelits

Image
I was hesitant about the *NEW* Framelits dies but they are my new favorite accessory, I can do so much with them and they make all of my cards look so "wow", with little effort I might add. The following two cards were done at my last Stamp Club meeting, if you don't belong to a Stamp club you are missing out ;). This card features products from the Sale-A-Bration catalog. We simply attached our dsp to the front and the cut out a "window" using the Labels framelits die, I love that you can place these anywhere on your card. We then cut another frame out of poppy parade to place inside. The lovely butterfly on the front is made using the blossom punch. To get a butterfly fold your blossom in half and trim it to leave only the wings of a butterfly. Supplies Stamps: Fresh Vintage (SAB) and Friendly Phrases (IB&C) Ink: Poppy Parade and Whisper White Paper: Pool Party, Lucky Limeade, Poppy Parade and Whisper white card stock; Everyday Enchantment dsp Acce

Patchwork Card

Image
I apologize because this card features designer series paper that you cant purchase until July. It was on special last month and I simply LOVE it! If you were able to get some I know you are feeling the same. The card style is a Z-Fold, just something fun and different. It's very easy to do, start with a piece of cardstock 4.25" x 11" score it at 2.25" and 5.5". Fold it in half and the fold the flap back. I attached the Top Note die-cut to the front. When I do the patchwork I start with a rectangle and use 1-1/4" squares (easlily done with our punch), I adhere them to my square and then I ran them through the Big Shot once to cut out my shape and then again with the Vintage Wall Paper embossing folder to give it the "quilted" look. SUPPLIES Stamp Sets - Four Frames (available in July) and Just Believe Ink - Early Espresso Paper - Marina Mist, Early Espresso Sahara Sand and Whisper White; Paisley Petals (available in July) and Early Espresso

Greenhouse Gala Center Stair

Image
Here I another tent card, my last one this week. It features the Greenhouse Gala DSP and the new verse set Happy Greetings from the Summer Mini. I love how that is all the stamping this card needed, the paper stands alone. SUPPLIES Stamp set - Happy Greetings (Summer Mini) Paper - Daffodil Delight, Pear Pizzazz, Pumpkin Pie, and Whisper White; Greenhouse Gala dsp and Pumpkin Pie patterns dsp Ink - Early Espresso Accessories - silver brads, scallop circle punch, and white taffeta ribbon.

Fancy Fold

Image
Here is a fancy fold I came across on splitcoaststampers.com. I have been calling it a "center stair card" since it resembles some of the stair cards we have seen. This card again features the Flower Fest stamp set, found in the new Summer Mini . You can find directions for this fun card here . Supplies Stamp Set: Flower Fest and A Word for You Paper: Cherry Cobbler, Certainly Celery, Baja Breezeand Whisper White; Certainly Celery patterns dsp Ink: Cherry Cobbler, Marina Mist, Daffodil Delight and Early Espresso Accessories: 1-3/8" circle punch, 5-petal flower punch, 2-3/8" scallop punch, 2-1/2" circle punch, scallop edge punch, small oval punch, modern label punch,white taffeta ribbon and sponge daubers

Flower Fest Card

Image
Here is the first set I purchased from the new Summer Mini . It is my favorite by far. What I really like about this set is that most of the flowers have a matching punch, so no having to cut out every flower to create those fun looks we all love. Not that I mind doing that but isn't it nice when you don't have to. Oh, so this set is called Flower Fest (122278 $27.95 w; 122280 $19.95c), page 20 in the Summer Mini. The verse you see is also from the Summer Mini , called Happy Greetings (123311, $18.95w; 123313, $14.95c) it is full of some very cute and fun verses, I was in need of a new set and this fit the bill perfectly. I call this card a flap card because the front is made of a flap 3-1/4" wide. It attaches at the back and folds around to the front (the flap is 4-3/4" x  3-1/4"). To make the flowers I stamped the images in a bold color and then using sponge daubers and a slightly lighter color I sponged color into the centers. Then I easily punched them out

Sweet Cupcake

Image
It has been a while since I last posted a project. I have been busy with the kiddos and their very busy school and social schedule. I did find time to play with my Create a Cupcake set and the center stair fun fold. We made this card at my last stamp club meeting. We used different colors though. Supplies: stamp set: Create A Cupcake paper: pink pirouette, melon mambo, early espresso and whisper white cardstock; ice cream parlor designer series paper (SAB) ink: melon mambo, early espresso, and pretty in pink accessories: cupcake punch, old olive taffeta ribbon, dimentionals, stampin write markers, and basic rhinestones The measurements and instructions are quite simple. The cardstock measures 4.25" x 11". You cut a slit along each side 3/4" in, from the 1" to 6.5". Along the short side score your cardstock at 1", 2" and at 6.5" from the outside in. Then score at the 5.5" from the left cut line to the right cut line. I have added a small d

Baby Blossom Tent Card

Image
Here is a fun fold called a tent card. The card featured the Baby Blossoms stamp set and Springtime Vintage designer series paper. The center is cut out using the top note die. You could easily use the extra large circle or scallop punches as well. The card base measures 4.5" x 10", scored at 5". The bottom is connected by another piece of cardsock measuring 4.25" x 4", scored at 1", 2", and 3" vertically. This bottom portion is accordian folded and glued to the inside bottom of the card, allowing it to stand. And the front appears as a window. Supplies Stamps : Baby Blossoms Paper : baja breeze, confetti vanilla, not quite navy and very vanilla cardstock; springtime vintage designer series paper Ink : not quite navy, baja breeze, crumb cake and pear pizzazz Accessories : baja breeze seam binding, decorative label punch, dotted scallop ribbon punch and the top note die Happy Stampin' Tricia

Inlaid Embossing

Image
Another card we are doing in my technique club this week. I must say I LOVE this card. It is so fun and so easy. I saw it a while back and knew I need to try this technique out. I have since heard it called faux pressed flowers, but you don't necessarily have to use flowers, although I did ;).      For this card we punched flowers using the Boho Blossoms punch (119858, $16.95), in melon mambo, bashful blue, peach parfait patterns dsp as well as the newsprint dsp. Now since these punches are so small we used the new SU! adhesive sheets (120805, $14.95 for 12 12x12 sheets) and just placed our punches onto the sheet. Next you just lift them off and place them wherever you like. The adhesive is attached to the back of your punched pieces, no messy glue to worry about. We placed all of our flowers onto the white cardstock and then embossed it with the Square Lattice embossing folder. We mounted the white onto Peach Parfait, added at strip of paper from the sale-a-bration Ice Cream Par

Pin-Wheel Fun

Image
Here is a peek at what we will be doing in my technique class this week. This card features a fun pin-wheel as well as the sweet stitches designer series paper, and the sweet summer sale-a-bration set. I got this card layout from another wonderful stamper and SU! employee, Richard Garay. I get most of my layouts from other stampers and I do try and give recognition whenever I can. Sometimes though I see a card somewhere and just draw a simple sketch on a scrap of paper. I encouarge you all to do the same, if you see a card you like scribble a rough outline to pull out later when you need a quick layout. **Don't forget now through March 31st you can get free stamps. paper and ribbon with every $50 in product purchases! When you hostess a home workshop you earn even more free goodies! Contact me today for details.** Supplies: Stamps - Sweet Summer SAB, Apple Blossoms (hostess level 2) Paper - peach parfait, bashful blue, pear pizzazz and whisper white cardstock; sweet stitches

Scallop Circle Flower

Image
I thought I'd share with you another of my fun favorites. The flower on the post it note holder. The holder was shared by Sandy Hancock and you can get directions for it here . It is adorable isn't it? For the flower, start with two 2-3/8" scallop circles, score them across in between each scallop all the way around. Then snip along one of the score lines from the outside into the center. Accordian fold the flowers along the score lines forming a fan. Last, adhere the two "fans" together and add a button for the center. You can add the beauties to anything for a bit of a wow!  Here are where the score lines go  A small snip from the outside in   The two fans just before you adhere them together Happy Stampin' Tricia

Clearly Christmas Card

Image
Can I just say I love this card! We did this in technique club last week using the window sheets, and the yummy Candy Cane Christmas specialty DSP. The base is Real Red and measures 5-1/2" x 5-3/4" and scored at 4-1/4". I scalloped one end of the base and attached the window sheet (4-1/4" x 5-1/2") underneath the flap. I then layed a 5-1/2" x 1-1/2" piece of dsp onto the window sheet at the bottom. The stamp set is Season of Joy (110384, $26.95). I stamped the swirls onto the window sheet using Staz On ink in white (106960, $11.95). The tree was colored with Stampin' Write markers and stamped on the inside (whisper white 4" x 5-1/4") and then on a seperate sheet and cut out for the outside. Last I wrapped some Tinsel Trim (Winter Mini, 120993, $7.95) around it and tied on a piece of the Real Red satin ribbon. Oh and I added a Basic Rhinestone to the top of the outside tree. I really love how this turned out. It was fun and easy and spark

Brayered Masking

Image
I have been a busy stamper lately, and loving it I might add. I taught a new technique this past week to my stampin' club and I just love the way it turned out. I am calling this Brayered Masking as I don't know what else it is called. I haven't seen it anywhere yet and it did come from a mistake. I was trying out another technique and this is what happened when I couldn't master that one ;). I plan on using this technique a lot, as well as this beautiful sneek peak stamp set I can't seem to put down. So here is the sample of the card. I am also going to attempt my first tutorial tomorrow, so come back tomorrow for directions on how you can make this fabulous card. Yay! Supplies: stamp set: Awash with Flowers, Well Scripted cardstock: barely banana, whisper white, basic black and shimmer white. ink: basic black, certainly celerey, summer sun, and pumpkin pie dsp: build a bear accessories: hugs love note, celery satin ribbon, scallop edge punch, brayer and bl

Sparkly Fun

Image
To stamp with me is to know I like a bit of bling. So when the recent Occasions mini catalog came about and I saw the Sending Love Specialty designer series paper (item 117153), I had to have some. It's beautiful, every page has glitter accents. Now the paper is real red, pretty in pink, chocolate chip and vanilla, excellent for valentines and actually good for everyday cards as well. But I have made many cards with it and am looking forward to seeing new patterns in the specialty dsp series. (By the way...the Summer mini is due out May 1st, YAY!) Well, again to know me is to know that I can never wait and I always need things now. SO, I decided to make my own "specialty" paper. Way back when the 2009-2010 came out I earned the Lovely Flowers Hostess bundle. I have been hoarding the gorgeous paper ever since, bringing it out every once in a while to admire it and then putting it away to save for something really good. I decided to use it this time. I chose a card layout,

Technique stamp camp

Image
Here is what we made at my last stamp camp. The featured technique was embossing. Card #1 featured dry embossing with the sanding technique. Supplies cardstock: rich razzleberry, whisper white, and old olive ink: basic black dsp: razzleberry lemonade accessories: SU! Elegant Bouquet textured embossing folder, SU! Beautiful Wings embosslit (occasions mini), rhinestones from the eggsellent egg kit (occasions mini), sanding blocks, large oval punch Card #2 featured the emerging color technique Supplies Stamp set: Good friend, Petal pizzaz cardstock: chocolate chip, so saffron, whisper white ink: pretty in pink, bashful blue, certainly celery, basic brown, and versamark accessories: eggcellent egg kit (occasions mini), modern label punch, clear embossing powder, silver brads and the brayer Card #3 featured faux embossing and embossing on patterned paper Supplies stamp set: wow flowers cardstock: bermuda bay, whisper white, barely banana ink: melon mambo and versamark dsp: sweet pea (oc

Happy Mother's Day

Image
Here is the card I lovingly put together for my mom. I love you mom! I hope all of you Mother's out there have a wonderful day. Happy Stampin' Tricia  Supplies: Stamp set - Occasions collection paper - Bella Rose dsp, riding hood red cs, pink pirouette cs, kiwi kiss cs, chocolate chip cs, and whisper white cs ink - basic brown accessories - chocolate taffeta ribbon, scallop square punch, stampin' write marker, 1 1/4" circle punch, crop-a-dile, felt flowers, and slot punch