Posts

Showing posts with the label tutorial

Jolly Christmas Card

Image
Here is another wonderful SU! video. I just love these. So did you see this card in the catalog? I did and I thought it was adorable. Well now with this video I see it is simple to do too. I can't wait to try it. I will be sure to demonstrate this card at my upcoming classes. If you have not yet signed up for a September class be sure to check out my "classes" page and RSVP today. Happy Stampin' Tricia

Tea Shoppe Technique

Image
Ever wonder where we demonstrators get our great ideas? From Stampin' Up! of course! And other creative demonstrators too. That's what I love about what I do, the community of demos is one of sharing and fun! Most of what I do is an extension of what someone else may have shared. It's a compilation of many things sometimes. And when all else fails, SU! is there with videos like these. This little box is adorable and I had to share it with you. I can't wait to see how you adapt it and make it your own. I can see it as a birthday theme or a treat for a new mom. Feel free to link back a picture to this post and share what you did! Thinking you might want 20% off of all your SU! products plus an opportunity to have your business pay for itself and even earn a little extra? You can become a SU! demo for just $99! And through September 16th you will get an adorable Halloween shadow box kit FREE. The kit includes the lovely Toxic Treats set, bakers twine, basic rhinestomes

Preserved Catalog - Case

Image
This card layout is from the 2012 Holiday Catalog, which is why it is "cased" Copy And Share with Everyone. I changed it a bit of course! We made this cute card at my last stamp club meeting. Isn't the new designer series paper gorgeous?  Supplies Stamp set: Perfectly Preserved Ink: raspberry ripple and early espresso Paper: Orchard Harvest designer series paper; early espresso, island indigo, lucky limeade, and whisper white card stock Accessories: island indigo ruffled ribbon, scallop punch and dimentionals I especially love the apples from the Perfectly Preserved stamp set. We popped out the top and bottom apples but the middle one is actually 3 apples glued back to back. I have a quick tutorial to show you. You want to start by stamping and die (or punching as the case may be) cutting 3 apples. You will want to fold each of these in half. I lined them up and put glue on my center apple. I made sure that they are all facing the same way, you don'

Christmas In July

Image
Thanks for visiting today! Here is my Frosty Friends swap card for the Over the Top swap, "Bling It". This swap was organized by Barbara Jackson, thanks Barbara I had a great time. Frosty Friends stamp set (C) Stampin' Up! I tried to use as many "blingy" things as I could. I used our silver glimmer paper, basic rhinestones,dazzling diamonds glitter, and shimmer paint. Now with the shimmer paint I used the new spritzers available in the new catalog, I poured some of the paint in the spritzer, added some water and spritzed the paint onto my card. I used my two way glue on the snowmen by tracing the outlines and then sprinkling on the dazzling glitter. The snowflake is cut using our new snowflake die. SUPPLIES stamp set: Frosty Friends, Easy Events ink: staz on black, early espresso paper: sahara sand, whisper white, cherry cobbler, and pool party card stock; pool party designer prints paper accessories: cherry cobbler seam binding, ribbon punch, s

Soft Suede, Poppy Parade and Pool Party

Image
Such a lovely combo that I never would have paired if it weren't for the Sale-A-Bration designer series paper. This paper is so pretty! I can't put it down and I want to use it on every project I make. I have a card sample for you today that is a variation on one I already did. I have stopped putting greeting onto my card samples as I never have the right one when I need it. I just put my verse on when I am ready to send my card. Supplies: Stamp set: Fresh Vintage Paper: soft suede, pool party and whisper white cardstock; everyday enchantment dsp (SAB only) Ink: soft suede Accessories: decorative label punch, 3/4" circle punch, blossom punch, clear buttons, white bakers twine, and dots embossing folder. This box was adapted from Mary Fish , who got it from another demo, who got it from another demo :). I tweaked it a bit on the lid measurements but everything else is the same. The candies were wrapped using the dsp. My tag was made with the Labels framelits die. My

Designer Cuts Box

Image
I am in love with the NEW Designer Cuts cards in the Occasions Mini, if you have been to any of my classes in the last month you will have gotten to use them. They are so elegant and quick. Well, this sweet box here was made with a single Designer Cuts card.  I personally love it when the products I buy are good for many other uses. So to get on with it here is what you do. Open up your Designer cuts card and lay it down on your Simply Scored board with the line running the same way as the scores. I made a score line 1/2" from the center line on either side. So you will have a total of 3 lines.  Next turn your card 90 degrees and score it at 1" on both sides. You will then cut slits for your tabs from the outside in at the box bottom up to the lines that you just scored. Your box should look like the picture here. The box then folds up. I added a piece of designer series paper on the inside laser cut side before I assembled my box. You can assemble your box with sticky stri

How to make SU! Paper Peonies

Image
 Don't you just love the paper peonies on the front of the new 2011-2012 Idea Book and Catalog? I do, they are so beautiful and fresh! Here is a quick tutorial on making them. I attached mine to bamboo skewers in the photo, but you can use floral wire as well. If I had some I would have used that. Step 1:  Punch 3 scallop circles using the 2-3/8" scallop circle punch. Step 2: Spray the circles very lightly with water to soften them. Scrunch them up into balls and work them until they are mostly dry. If they are too wet they can tear in the next step, trust me I know ;) Step 3 Unfold them carefully and find an edge where you can easily pull them apart. You will end up with six scallop circles all together. Step 4 Lay all of your circles one on top of the other and secure them with a brad. I chose to layer them fuzzy side up.   Step 5 Pull the layers one at a time up into the center. Step 6 Fluff your flower into the peony shape.

3 x 3 Note Card box

Image
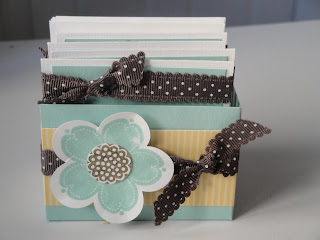
Here is a look at the new color Pool Party In Color for 2011-2013. I made this cute little box to hold some 3x3 notecards. The stamped flower you see on the front of the box is a new Hostess stamp set available this year. Below you will find the complete tutorial on this cute little number. *NEW HOSTESS PROGRAM* This year the hostess program has changed, in the past hostesses were able to pick a level stamp set and had additional hostess dollars to spend. This year hostesses are only given Hostess Dollars which they can use to purchase Hostess only sets at a deep discount or to use on catalog merchandise of their choice. In addition when a hostess reaches just $400 in orders she can choose an item in the catalog at 50% off! I am really excited about this new Hostess Program it is much more versatile. BOX TUTORIAL Here is the tutorial on the card box above, it is so simple and a cute gift. The box is my own design and just a basic box template. You need a piece of cards

Scallop Circle Flower

Image
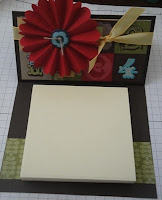
I thought I'd share with you another of my fun favorites. The flower on the post it note holder. The holder was shared by Sandy Hancock and you can get directions for it here . It is adorable isn't it? For the flower, start with two 2-3/8" scallop circles, score them across in between each scallop all the way around. Then snip along one of the score lines from the outside into the center. Accordian fold the flowers along the score lines forming a fan. Last, adhere the two "fans" together and add a button for the center. You can add the beauties to anything for a bit of a wow!  Here are where the score lines go  A small snip from the outside in   The two fans just before you adhere them together Happy Stampin' Tricia