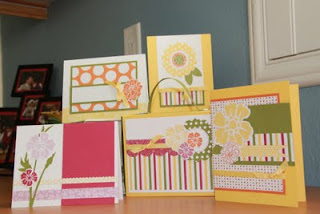
Posts

Showing posts with the label 3D item

Gift Sets

Image
Here are some gift sets I gave to some parent helpers at school this past week. I got the pattern here , it is so easy to put together, I have used the pattern several times. They easily fit 4 note cards. The designer series paper I used is on the retirement list, so sad to see it go! SUPPLIES stamp set : Apple Blossoms (hostess) paper : Marina Mist cs, early espresso cs, and Pear Pizzazz cs; Greenhouse Gala dsp and News Print dsp Ink: Early Espresso Accessories: Ribbon punch, fancy flower punch, modern label punch, window punch, wide oval punch, decorative label punch, scallop edge punch, 3/4" circle punch (think I like my punches?) vintage brads, sneak peek ribbon, and whisper white taffeta ribbon. These two sample are the same pattern only done in Pear Pizzazz.

Playful Polka Dots Boxed Set

Image
Here is a sample of my class for this month. It features the Playful Polka Dots Simply Scrappin' Kit. The boxed set includes the adorable handle box and four cards with envelopes. You do receive 1/2 of the Simply Scrappin' kit with your class and you can actually make many more cards than the 4 shown. The cost for the class is $20. Today is the last day to RSVP but I will have kits available for those who cannot make the class. These will be available for pick-up after June 18th. Each kit comes with everything pre-cut and scored as well as detailed instructions for assembly.  Please see my classes section for more details. **Edited to add** The class starts at 10am, but this week I am offering a 9:30 start time as well. The summer months make for busy schedules so I am happy to start a half hour early. The class shouldn't be longer than 1 hour. SUPPLIES: Paper: Playful Polka Dots Simply Scrappin' kit; Whisper White cardstock Accessories: Dimentionals, Daffodil De

Wine Tag

Image
Here is what we created at stamp club last week. It is the perfect tag for the perfect gift. One of the ladies in club saw some cute wine tags from a winery and thought "we can make those", so we did. The tag uses the Top Note die (113463) , Square Latice embossing folder (119976), Vintage Springtime dsp (Occasions Mini), and the 3/4" circle punch (119873) for the grapes. To make the grapes we started with a piece of cardstock cut into a triangle. We layered the circles (6 in Perfect Plum and 7 in Concord Grape) from the top down. I did 3 in the top row, 4 the next, then 3, then 2, then 1. The leaf is the 5-petal flower punch in Pear Pizzazz. Happy Stampin' Tricia The April Spring is Blossoming Promotion going on now! Follow the flyer to the left for details. Get your new products today!

Petal Cone

Image
This adorable little cone is a lovely new die made especially for Stampin' Up! by Sizzix. It is truly the simplest die to use, I absolutely love it! We will be making these at the next stamp camp on March 12th. Please rsvp by March 7th. SUPPLIES Paper: Pink Pirouette and Sahara Sand cardstock; Pretty in Pink patterns dsp Ink: Crumb Cake Accessories: Flower die, 1" circle punch, linen thread, sponges, Ice Cream parlor button, basic rhinestone, rhinestone brads, 1-3/4" circle punch and whisper white taffetta ribbon Happy Stampin' Tricia

Tin and Cards class

Image
Here is some of what we will be making at my next class on March 12th. These items feature the Sew Suite designer series paper and the new Flower die. Please be sure you rsvp by March 7th, I only have a few tins available. The cost for supplies is $22. The class includes the Many Thanks single stamp. Happy Stampin' Tricia

What can you do with fabric?

Image
We introduced fabric into our product line this last August, I will admit to you that I did not own any until my last order a week ago. Now I can honestly say I love it! And this week it is 50% off so of course I ordered more. And wait until you see the fabric in the next mini catalog...yummy! So here is what I have done so far. I made two coasters, one I free handed a heart and the other I used my big shot to die cut the scallop square shapes. I had some iron on fleece that I sandwiched between and taught myself the blanket stitch from the internet. Voila! Cute. I think you could also add a bit of ribbon and make them sweet tree ornaments. The second thing I did with the fabric was add it to a card, of course. I had a leftover strip of the polka dot and I just wrapped it around as I would ribbon and tied it on. Again, very easy. The fabric I chose was the Candy Cane, and I did that because I felt it was more versatile. I knew I could use it for reasons other than Christmas. The card I

Scallop Circle Flower

Image
I thought I'd share with you another of my fun favorites. The flower on the post it note holder. The holder was shared by Sandy Hancock and you can get directions for it here . It is adorable isn't it? For the flower, start with two 2-3/8" scallop circles, score them across in between each scallop all the way around. Then snip along one of the score lines from the outside into the center. Accordian fold the flowers along the score lines forming a fan. Last, adhere the two "fans" together and add a button for the center. You can add the beauties to anything for a bit of a wow!  Here are where the score lines go  A small snip from the outside in   The two fans just before you adhere them together Happy Stampin' Tricia

Witch Hat

Image
Here is an adorable Witch hat I made this weekend. I made this trianlge box a couple years ago as a Christmas Tree, it was adorable, and a bit smaller. This hat measures 4-1/4" x 5-1/4 when finished. You can stuff it with candy or little gifts. I plan on making these for Rowen and Nicks friend this year for Halloween. Club members we will be making these at our next class! Happy Stampin' Tricia

Candy Countdown Calendar kit

Image
I love this! It is adorable and so easy to put together. The quality is again top notch especially for the price (120926, $19.95). The boxes are a good size, 1.5 x 1 7/8 x 3.5 widening to 2 1/8 x 2 5/8 at the top. The kit is meant to be used as a countdown to Christmas calendar and I plan on using it as such. But now that I have one in hand I want a second kit I can use for small Christmas gift for family and friends. A giftcard will easily fit inside as will cookies, and candy. They will also look adorable hanging on the Christmas tree! I can't get over how much product you get with this kit. You get 25 of the boxes, if you have ever bought the cute take out boxes at a craft store you can see the value right there. And did I mention the boxes are patterned and require no adhesive? Too cute! You also get 25 pieces of  12" real red grossgrain ribbon to hang the boxes, a long strand of rope and 25 adorable tiny clothespins. The cut outs are a made of a heavy cardstock and are q

Halloween class

Image
We will be making this adorable house at my halloween stamp camp on Sunday September 26th. It is made with the Home Decor build a house featured the new Winter mini. We will also be making some cute treats for the ghouls in your life. Please RSVP by Septrember 12th as I do need to order the houses well in advance. The cost for supplies is $20. Happy Stampin', Tricia

Roladex Stamp Camp

Image
Here is the picture of the roladex we made at my last stamp camp. It is perfect for keeping track of birthdays and anniversaries. This one features Cottage Wall dsp. The class was great fun. If you would like a kit please email me. They are $15 each and include the stamped images, designs will vary to cardstock and paper I have on hand. Be sure to RSVP for my next mini stamp a stack by July 10th. We will be stamping 10 cards using new products from the *NEW* catalog. The cost for supplies is $15. Happy Stampin' Tricia

Dollar Spot find

Image
To know me is to know I stalk the dollar spot at my local chain store (that is right up the street). SU! says we can't name stores so email me if you have questions ;). Anyway, I found this clear clipboard for $2.50 and fell in love. I knew when I saw it that I wanted to attach my paper to the back so it would show through. Now the clipboards did also come in pink and blue I believe, both transparent as well. But clear was my favorite. This took me about 3 minutes to make, it measures 12.5 x 9, which is why you see the solid strip of pumpkin pie at the bottom. I did attach that to both front and back. I used my sticky strip to attach all of my paper, you can still see it slightly. The last touch was a scrap of white satin ribbon that was sitting on my table. Happy Stampin' Tricia Supplies: Island Oasis dsp, pumpkin pie textured cs, white satin ribbon nd sticky strip